tom_hampton
Grandmaster Brewer
- Joined
- Oct 8, 2011
- Messages
- 929
- Reaction score
- 0
KernelCrush requested that I put together a description of how I manage my fermentation room, and (by extension) my fermentation temperatures. So here goes.
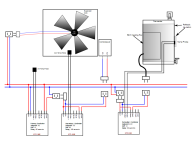
Attached is a schematic of the controllers, AC unit, and one fermentation vessel.
Ok, the fermentation room is a 46x46x9' closet. I filled the walls with spray foam insulation. The walls are then lined with 1" foam board insulation and sealed with aluminum tape. There is a double layer of foam board on the ceiling. I have a ~150 bottle wine rack in the center, and each side of the closet has wire shelving from home depot. The bottom shelves are high enough to store 4 kegs underneath on each side. My primary fermenters (plastic buckets) sit on the first shelf. Bottles, hops, wine, aging commercial beer, and various other stuff are stored on the remaining shelves.
I use a home Depot 6000 btu ac window unit to cool the room. This unit has a mechanical thermostat. This makes it a bit easier to bypass it. Normally the fan only comes on when the compressor is on. But, when the ac is run so close to freezing it helps to run the fan continuously. When the compressor isn't running the fan helps to warm the coils back up to room temperature faster. This helps to prevent ice from forming on the coils or melt any that may have formed. It also helps keep the temperature more uniform from floor to ceiling. So, I rewired the fan to be powered directly from wall power. I added a second ac chord to power the fan.
I use two stc1000 controllers to manage the ac compressor. These controllers are connected in series.
The primary controller temp sensor measures the air temp in the room. It is mounted in a yeast vial that is filled with ice pack gel, and the vial is suspended in the air about 4 feet off the ground. The controller is configured for a 1c delta, 1 minute delay. The setpoint is set at 9c. The COOL output is used to drive the secondary controller.
The secondary controller is powered by the primary controller, so it only comes on when the primary controller is on. It's temperature sensor is embedded in the evaporator coils of the ac unit. The purpose of this controller is to keep the coils from freezing up. The setpoint is set at - 3c. The delta is set at 8c. The delay is set for 3 minutes. The COOL output is used to drive the compressor.
So, here is how this works:
1. The room warms up to 10c, so the primary controller output goes active. This applies power to the secondary controller.
2. The secondary controller measures the evaporator coil temp at 10c (same as the room). This starts the delay timer. After 3 minutes, the controller activates it's output and turns on the compressor.
3. The coils will then get cold. Most ac units are designed so the coils run about 12c below the room temp. So, after the system stabilizes, the coils will drop to between 0 and -1 degrees c. As the room cools the coils will continue to cool also.
4. Eventually, the coils will get down to the setpoint of - 3c. When that happens, the secondary controller turns off the compressor until the coils warm back up to 5c.
5. Once the coils reach 5c, the controller will turn the compressor back on (assuming the 3minute delay has expired). This temperature and time ensures that any small amount of frost/ice that forms on the coils has a chance to melt, before the compressor kicks back on.
6. Steps 4 and 5 repeat until the room air temp reaches 9c and the primary controller shuts off.
7. The whole sequence then starts over.
[br]
So, what's the point? When the coils drop below freezing the condensation that naturally forms will start to freeze on the coils. Without the secondary controller, the ice will decrease the airflow through the coils, which will cause them to get even colder. Thus more ice forms. This process quickly runs away and the coils get caked in ice. The risk of this is much higher in the summer when the dew point is much higher (more total water in the air).
The secondary controller limits the coil temperature to a manageable level. -3c is what works for me here in Texas in my worst case summer conditions. I started at - 5c and every time the system froze up I raised the threshold by 1c. It's been running this way for two years.
The ac unit itself is mounted on the wall above the doorway. I built a shelf out of plywood and built a duct, also out of plywood, to redirect the air intake to draw from below instead of in front. The point to to reduce short cycling of the cold exhaust air back into the intake. I also have a secondary fan to blow the cold air down to the bottom of the room.
The air used to cool the condenser coils is drawn from the house through a vent. The hot exhaust from the condenser coils is vented into the wall above the doorway and then up into the attic.
So, all this gives me a room at 9c (48f). I can go colder in the winter; my main limitation is risk of forming ice on the evaporator coils. But, I can hold 9c in the most humid parts of the year. I suppose if I got it down another degree or two in the winter, I could ferment a lager. But, I don't have a lagering fridge.
In order to ferment my beer I use more stc1000 controllers with cheap heating pads and reflectix insulation. As I said above, I tape the probe to the fermenter and cover that with a 1 inch thick layer of insulation. I have several pads of reflectix insulation that I have folded over to make a 1" thick pad. I simply tape these over the probe. I tape the heating blanket to the fermenter on the opposite side from where the probe is mounted. I then wrap the fermenter in a layer of reflectix. This setup is good for fermentation temperatures up to 20c. If I want to go higher I need a second layer of insulation. I keep saying that I'm going to make something more permanent (sewn pockets with velcro straps or something), but I just use cheap masking tape. It does the job fine, but it doesn't look very "cool".
The heating pads need to be the most basic type. Many (most) heating pads today have an autoshutoff feature, that automatically shuts off the heating after about 2 hours. These are BAD, BAD, BAD for homebrew. I use these:
http://www.amazon.com/gp/product/B000F54AOW/ref=oh_details_o08_s00_i00?ie=UTF8&psc=1
Another option is flex watt heat tape:
http://www.amazon.com/Flex-Watt-Heat-Tape-Watts/dp/B00AHEZF6S/ref=sr_1_1?ie=UTF8&qid=1387586995&sr=8-1&keywords=flex+watt
This is what I will use when I rebuild my fermenters out of stainless.
I have room for 4 primary fermenters in the closet. When things are really hopping, I generally have 2 long term ales (funky beers, sour beer, barely wine, etc), and two short term beers (your standard ales from USA, England, Belgium, and Germany). This approach allows me to ferment each of the 4 primary fermenters at a different temperature, and on its own schedule. When fermentation is complete I unplug the heating pad, and allow the beer to cool to storage temp. After it clears, I drain it into a keg for bulk aging.
I also store my kegs in the closet: I have 4 serving kegs, and 4 storage kegs.
Also attached is a picture of one side of the closet, showing two fermenters. The other side is the same. I tried to take some pictures of the AC unit. But, its just too tight in there. I can't get more than about 2 feet away from it, so its hard to see anything.
One final note: I don't like lifting full buckets of wort, or full kegs of beer. So, this fermentation room is located in what was the "coat closet", just inside the side door to our house. I brew on the covered side porch. I have a small pump that I use to move the wort from the kettle into a fermenter that has been pre-placed on a shelf in the closet.
Second, I don't like exposing my cooled wort to unsanitary air. I have a electric stirrer for my wort. I use it with my immersion chiller to get the wort down to pitching temp. The stirrer is attached to a "lid". Once I turn off the flame, the lid is closed and is not opened again. Once the wort is chilled and has cleared, I use the pump to push the wort into the fermenter. So, it is never exposed to outside air after flameout.
I sanitize my fermenters by filling them with 5 gallons of star-san at the start of the brewday. I let everything cold-side soak for the 4-ish hours it takes to brew. Then I drain the star-san into another container. Then I clamp on the lid, and feed my pump hose into the airlock opening. I pump about 1 gallon of star-san through the pump hose back into the fermenter. I shake the fermenter to distribute. Then I drain the star-san out of the spigot, and place the fermenter on the shelf in the closet. Once the wort is ready to transfer, I pull the hose out of the opening until it reaches the pump. Then I pump the wort. Voila, wort in place...sanitary...and I haven't thrown my back out for the umpteenth time.
Attached is a schematic of the controllers, AC unit, and one fermentation vessel.
Ok, the fermentation room is a 46x46x9' closet. I filled the walls with spray foam insulation. The walls are then lined with 1" foam board insulation and sealed with aluminum tape. There is a double layer of foam board on the ceiling. I have a ~150 bottle wine rack in the center, and each side of the closet has wire shelving from home depot. The bottom shelves are high enough to store 4 kegs underneath on each side. My primary fermenters (plastic buckets) sit on the first shelf. Bottles, hops, wine, aging commercial beer, and various other stuff are stored on the remaining shelves.
I use a home Depot 6000 btu ac window unit to cool the room. This unit has a mechanical thermostat. This makes it a bit easier to bypass it. Normally the fan only comes on when the compressor is on. But, when the ac is run so close to freezing it helps to run the fan continuously. When the compressor isn't running the fan helps to warm the coils back up to room temperature faster. This helps to prevent ice from forming on the coils or melt any that may have formed. It also helps keep the temperature more uniform from floor to ceiling. So, I rewired the fan to be powered directly from wall power. I added a second ac chord to power the fan.
I use two stc1000 controllers to manage the ac compressor. These controllers are connected in series.
The primary controller temp sensor measures the air temp in the room. It is mounted in a yeast vial that is filled with ice pack gel, and the vial is suspended in the air about 4 feet off the ground. The controller is configured for a 1c delta, 1 minute delay. The setpoint is set at 9c. The COOL output is used to drive the secondary controller.
The secondary controller is powered by the primary controller, so it only comes on when the primary controller is on. It's temperature sensor is embedded in the evaporator coils of the ac unit. The purpose of this controller is to keep the coils from freezing up. The setpoint is set at - 3c. The delta is set at 8c. The delay is set for 3 minutes. The COOL output is used to drive the compressor.
So, here is how this works:
1. The room warms up to 10c, so the primary controller output goes active. This applies power to the secondary controller.
2. The secondary controller measures the evaporator coil temp at 10c (same as the room). This starts the delay timer. After 3 minutes, the controller activates it's output and turns on the compressor.
3. The coils will then get cold. Most ac units are designed so the coils run about 12c below the room temp. So, after the system stabilizes, the coils will drop to between 0 and -1 degrees c. As the room cools the coils will continue to cool also.
4. Eventually, the coils will get down to the setpoint of - 3c. When that happens, the secondary controller turns off the compressor until the coils warm back up to 5c.
5. Once the coils reach 5c, the controller will turn the compressor back on (assuming the 3minute delay has expired). This temperature and time ensures that any small amount of frost/ice that forms on the coils has a chance to melt, before the compressor kicks back on.
6. Steps 4 and 5 repeat until the room air temp reaches 9c and the primary controller shuts off.
7. The whole sequence then starts over.
[br]
So, what's the point? When the coils drop below freezing the condensation that naturally forms will start to freeze on the coils. Without the secondary controller, the ice will decrease the airflow through the coils, which will cause them to get even colder. Thus more ice forms. This process quickly runs away and the coils get caked in ice. The risk of this is much higher in the summer when the dew point is much higher (more total water in the air).
The secondary controller limits the coil temperature to a manageable level. -3c is what works for me here in Texas in my worst case summer conditions. I started at - 5c and every time the system froze up I raised the threshold by 1c. It's been running this way for two years.
The ac unit itself is mounted on the wall above the doorway. I built a shelf out of plywood and built a duct, also out of plywood, to redirect the air intake to draw from below instead of in front. The point to to reduce short cycling of the cold exhaust air back into the intake. I also have a secondary fan to blow the cold air down to the bottom of the room.
The air used to cool the condenser coils is drawn from the house through a vent. The hot exhaust from the condenser coils is vented into the wall above the doorway and then up into the attic.
So, all this gives me a room at 9c (48f). I can go colder in the winter; my main limitation is risk of forming ice on the evaporator coils. But, I can hold 9c in the most humid parts of the year. I suppose if I got it down another degree or two in the winter, I could ferment a lager. But, I don't have a lagering fridge.
In order to ferment my beer I use more stc1000 controllers with cheap heating pads and reflectix insulation. As I said above, I tape the probe to the fermenter and cover that with a 1 inch thick layer of insulation. I have several pads of reflectix insulation that I have folded over to make a 1" thick pad. I simply tape these over the probe. I tape the heating blanket to the fermenter on the opposite side from where the probe is mounted. I then wrap the fermenter in a layer of reflectix. This setup is good for fermentation temperatures up to 20c. If I want to go higher I need a second layer of insulation. I keep saying that I'm going to make something more permanent (sewn pockets with velcro straps or something), but I just use cheap masking tape. It does the job fine, but it doesn't look very "cool".
The heating pads need to be the most basic type. Many (most) heating pads today have an autoshutoff feature, that automatically shuts off the heating after about 2 hours. These are BAD, BAD, BAD for homebrew. I use these:
http://www.amazon.com/gp/product/B000F54AOW/ref=oh_details_o08_s00_i00?ie=UTF8&psc=1
Another option is flex watt heat tape:
http://www.amazon.com/Flex-Watt-Heat-Tape-Watts/dp/B00AHEZF6S/ref=sr_1_1?ie=UTF8&qid=1387586995&sr=8-1&keywords=flex+watt
This is what I will use when I rebuild my fermenters out of stainless.
I have room for 4 primary fermenters in the closet. When things are really hopping, I generally have 2 long term ales (funky beers, sour beer, barely wine, etc), and two short term beers (your standard ales from USA, England, Belgium, and Germany). This approach allows me to ferment each of the 4 primary fermenters at a different temperature, and on its own schedule. When fermentation is complete I unplug the heating pad, and allow the beer to cool to storage temp. After it clears, I drain it into a keg for bulk aging.
I also store my kegs in the closet: I have 4 serving kegs, and 4 storage kegs.
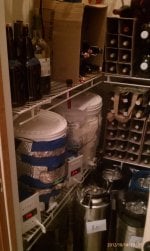
Also attached is a picture of one side of the closet, showing two fermenters. The other side is the same. I tried to take some pictures of the AC unit. But, its just too tight in there. I can't get more than about 2 feet away from it, so its hard to see anything.
One final note: I don't like lifting full buckets of wort, or full kegs of beer. So, this fermentation room is located in what was the "coat closet", just inside the side door to our house. I brew on the covered side porch. I have a small pump that I use to move the wort from the kettle into a fermenter that has been pre-placed on a shelf in the closet.
Second, I don't like exposing my cooled wort to unsanitary air. I have a electric stirrer for my wort. I use it with my immersion chiller to get the wort down to pitching temp. The stirrer is attached to a "lid". Once I turn off the flame, the lid is closed and is not opened again. Once the wort is chilled and has cleared, I use the pump to push the wort into the fermenter. So, it is never exposed to outside air after flameout.
I sanitize my fermenters by filling them with 5 gallons of star-san at the start of the brewday. I let everything cold-side soak for the 4-ish hours it takes to brew. Then I drain the star-san into another container. Then I clamp on the lid, and feed my pump hose into the airlock opening. I pump about 1 gallon of star-san through the pump hose back into the fermenter. I shake the fermenter to distribute. Then I drain the star-san out of the spigot, and place the fermenter on the shelf in the closet. Once the wort is ready to transfer, I pull the hose out of the opening until it reaches the pump. Then I pump the wort. Voila, wort in place...sanitary...and I haven't thrown my back out for the umpteenth time.