This week we take a look at instructions for all grain beer brewing using a single step infusion mash setup. Infusion mashing with a Gott type cooler, will unleash the full power of all grain brewing while keeping it simple.
Are you an intermediate brewer looking to make the leap to 5 gallon or 10 gallon all grain brewing? Do you want to learn how to brew all grain beer? Don’t be afraid of the mashing process. The vast majority of all grain brewers use a one step infusion mash to create outstanding homebrewed beer.
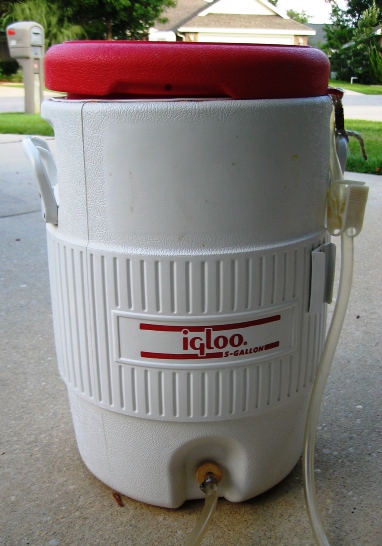
To use a one step infusion mash, you need some basic all grain brewing equipment. This includes a 7-9 gallon brew pot and a 5 gallon or 10 gallon Gott type water cooler with a false bottom. I personally use a Phils false bottom (9” diameter) in my cooler and drain using a hose that runs through the removed tap for the cooler. A properly sized stopper replaces the water tap as shown in the photo.
The infusion mash process is remarkably simple. Crush all of your grains in a mill first. The grain should be finely ground, but the husks of the grain should be relatively intact as the husks act as a filter in the grain bed. Next, heat a pre-measured amount of water, called an infusion, to a target temperature and mix it with the grains. This infusion step (mashing process) breaks down complex sugars in the crushed grain and converts it to simple sugars that can be fermented by yeast.
You can use one of many spreadsheets, online calculators (ex: here) or a brewing program such as BeerSmith to calculate the temperature and amount of infusion water needed for the mash. Make sure you use the correct equipment settings and total grain amount in the calculation. If using BeerSmith, make sure you have your equipment set up to include the water cooler as your mash tun and choose a “Single Infusion, Medium Body, No Mash Out” as your mash profile. Use a target step temperature of 154F, which is an excellent mid-range temperature for your first infusion mash. For BeerSmith, the “Preview Brewsheet” button on the toolbar will display step-by-step brewing instructions including the amount of infusion water to add.
Heat the recommended amount of infusion water to the temperature provided by your calculator or brewsheet. Slowly alternate adding water and grain to your mash tun until you have all of the water and grains mixed together. Insert a thermometer so you can track the temperature against your target step temperature. Close the top and let your mash temperature settle for 5-10 minutes.
Slowly mix your mash every 10-15 minutes to keep the temperature even and avoid hotspots. The mash mixture should reach a steady temperature close to 154F. If it is off by a significant amount, you can add a small amount of boiling or cold water to achieve the target temperature. Leave your mash mixture in the cooler for at least 45 minutes to assure that the sugar conversion is complete.
After 45 minutes, sparge the mash with hot water to extract the sweet wort that will be your beer. Sparging is nothing more than rinsing the mash with hot water to extract the sugars and create wort that you will later ferment to make beer.
Heat several gallons of water to 178F and slowly add it to to the top of your mash tun while drawing wort from the bottom of the grain tun using your false bottom and collect it in your boiler. The wort coming from the mash tun will start out cloudy with bits of grain and husks, but will soon run clear. Take the first few quarts of wort from the tun (the first runnings) and add them back to the top of your mash tun.
As you continue to sparge, it is important to keep the flow rate slow to maximize the sugars extracted. Lautering a 5 gallon mash tun should take at least 40-50 minutes to collect 6 gallons of wort. From this point forward, the process used to brew your beer is the same as it was with extract brewing. Add hops, boil the wort for 60-90 minutes, cool it quickly to room temperature and add your yeast to ferment your beer.
Switching to single infusion all grain brewing is a great way to gain more control over your beer, and requires only a little bit of additional equipment (a large cooler, false bottom, and full size brew pot) and time. The single infusion mash provides a great starting point for those transitioning to all grain. Take the leap, and enjoy brewing your first all grain today!
If you enjoyed this article, please consider leaving a comment or bookmarking us on one of the social sites below. You can also subscribe to future articles via email or RSS using the subscription bar on the left.
Pingback: brewpoll.com
You Write, “After 45 minutes, sparge the mash with hot water to extract the sweet wort that will be your beer. Sparging is nothing more than rinsing the mash with hot water to extract the sugars and create wort that you will later ferment to make beer.
Heat several gallons of water to 178F and slowly add it to to the top of your mash tun while drawing wort from the bottom of the grain tun using your false bottom and collect it in your boiler. The wort coming from the mash tun will start out cloudy with bits of grain and husks, but will soon run clear. Take the first few quarts of wort from the tun (the first runnings) and add them back to the top of your mash tun.”
I have been draining the mash tun completely before adding any of my sparge water. Should I simply be adding my first sparge infusion right on top of my mash water after it has sat for an hour at 155F?
Rep,
In an ideal situation you would fly sparge and keep the grain bed floating a bit with equal amounts of water entering and exiting it. Even in batch sparging you will achieve higher efficiency by adding some water to achieve two equal runnings. See our article on batch sparging:
http://www.beersmith.com/blog/2008/03/09/how-to-batch-sparge-a-guide-for-batch-sparging-and-no-sparge/
Pingback: Why Do I Have This All-Grain Urge?
Pingback: A little picture for you to enjoy... - Page 3 - Home Brew Forums
Is there any advantage to leaving the mash in the tun for extended periods? I have several recipees calling for an overnight rest in the tun.
Hi,
Recently a number of people have experimented with two day brewing including an overnight mash. I don’t think there is any huge advantage from a conversion perspective – if you have a highly modified malt and the right temperatures most mashes will convert within 60-90 minutes. Running an overnight mash can be useful if you are time constrained, but you need to worry a bit about cleanliness unless you want the mash to go sour overnight (which is another entire topic).
Brad
Pingback: How NOT to get started with all-grain brewing @ Seattle Homebrew
Pingback: new to AG, step by step and recipe? - Home Brew Forums
Pingback: » Brewing an Irish Stout Beer Recipe
You wrote “Heat several gallons of water to 178F and slowly add it to to the top of your mash tun…”
Is that a typo? Your sparge article says 168F which is more in line with other articles I’ve read.
Pingback: All Grain IPA Recipe… « Beer n Shtuff
I usually add higher temperature water for sparging initially to raise the overall temperature of the mash to 168F. Since the mash starts at around 150-154 normally, raising it to 168 requires some hot water during the sparge.
I just bought BeerSmith and am learning to use it. Is there a way I can enter a ‘no sparge’ mash in the pgm?
Thanks,
cliff
Cliff – if you select any of the BIAB mash profiles they will force the mash to use a full boil volume which is essentially the same volumes used in no-sparge. So BIAB profiles can be used for no-sparge.
Pingback: Mash Temperature and Beer Body in All Grain Brewing | Home Brewing Beer Blog by BeerSmith
Brad, I’m obsessing over mash efficiencies. And I’m also having trouble understanding BeerSmith’s water and efficiency calculations. For my latest session (my 15th with BeerSmith), I mashed with 23.36 qt of strike water and two sparge steps of 7.6 qt each over 17 lb of grain. BeerSmith calculates 2.04 gal in grain absorption, which my calculations agree with. This gives me an equal amount of wort from infusion and sparge steps. But the program also tells me I should have 9.08 gal into the boil kettle. How can this be? The sum of my strike and sparge is 9.64, and if I deduct 2.04 gal for absorption (not including dead space), I should have 7.6 gal (which, incidentally, is about what I got).
Also, I really don’t understand the sparge instructions, and I can’t find anything in the Support section about it. Here’s what I see:
“Bath sparge with 2 steps (Drain mash tun, , 4.54gal) of 168.0 F water”. What’s missing between the commas? I add my own sparge steps, as mentioned above (7.6 qt x 2 = 3.8 gal). So the question is: Does BeerSmith calculate the water I use in my strike and sparge mash steps, instead of these mysterious instructions?
Pingback: Beer Mashing Temperature, Home Brew mashing, How to Mash | Home Brewing in North East PA
Brad,
This was a great intro to all grain mashing. I currently partial mash with a few BIAB small volume boils under my belt. After moving I hope to grab a cooler and was confused how mashing with that would work. This summed it up well for a beginning brewer like myself.
Thanks
Brad, what is the purpose of using a cooler to sparge into. Wouldn’t buckets or kegs or brew pots work just as well? Does keeping the wort warm until it goes back into the pot to boil that critical.
Thanks
Pingback: The Barley Crusher Malt Grain Mill Review | Home Brewing Beer Blog by BeerSmith
Pingback: Brewing Water: Hard or Soft? | The Homebrewer's Pantry
Hi Brad,
Is this article, you state to heat the sparge water to 178F. I built an IPA recipe in BeerSmith and it is telling me to heat to 172F. That’s a fairly significant difference. Can you explain?
Thanks!
Mark
Pingback: Mashing for All Grain Beer Brewing | Joseph Cettina