Would you like to learn how to start kegging your own beer? Kegging your homebrew saves time and money and offers a very convenient way to serve your beer. This article walks you through the basics of purchasing a kegging system, filling your kegs and serving your kegged beer at home.
Purchase a Beer Kegging System
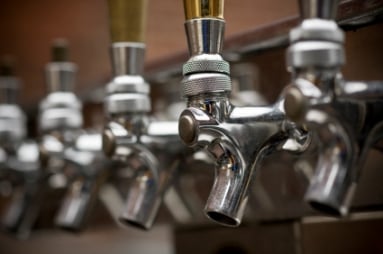
If you don’t already have a beer kegging system, you can purchase one from your local homebrew store or a major online brewing supply store. A kegging system consists of a keg, a CO2 (carbon dioxide) gas tank, a pressure regulator and two hoses. One hose feeds CO2 gas into your keg inlet, and the other hose brings the beer from the keg to your tap. Keg sizes vary, but the most popular size is the 5 gallon Cornelius or “Corney” keg.
If you are just starting out with kegging your own beer, it is best to purchase a complete starter system from a single store. Complete systems typically run less than $200 for an initial setup including all of the supplies mentioned above. Several popular brewing supply stores that sell kegging equipment can be found on our links page. Once you have your kegging system you will need to fill the CO2 tank with CO2 from a local beverage supply or gas supply store.
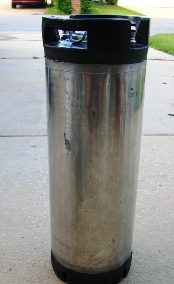 Cornelius Keg
 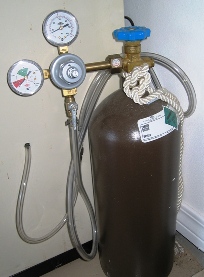 CO2 Tank
Filling a Keg
Give your keg a thorough cleaning before use, as many used Cornelius kegs have soda residue present. Pressurize the keg with gas once and check for leaks by applying a small amount of soapy water around the hose fittings and valves. Sterilize the keg with a stainless steel-safe agent such as iodophor before filling. Fill the keg by siphoning from your homebrew fermenter, being careful not to splash or aerate the beer.
Once the keg is full, put the top on it and pressurize the keg using your CO2 tank. Purge any remaining air in the keg and displace it with CO2. Do this by pressurizing the keg with CO2, then release air using the release valve on the top of the keg. Repeat this 4-6 times to make sure that all of the air is out and replaced by CO2. Once the keg has been pressurized with CO2, you can store it in this configuration for several months as long as the keg has no leaks.
Carbonating the Keg
Kegs must be stored under pressure and refrigeration to carbonate properly. I use an old refrigerator to keep 3 of the 5 gallon kegs on tap at all times, and I’ve drilled a hole in the side of the fridge so I can keep the CO2 tank on the outside. To calculate the carbonation pressure needed, put a thermometer in your refrigerator and leave it for a few hours. This will give you your carbonation temperature.
Next, using a Carbonation calculator such as BeerSmith (Carbonation item on the Tools menu), enter the volumes of CO2 desired to set the carbonation level (2.4 is a good starting number to use), enter the refrigerator temperature and volume of beer. BeerSmith will calculate the CO2 pressure needed to force carbonate the beer. If you don’t have access to a carbonation tool, start your system at 10 psi of pressure and adjust it later. Set your CO2 tank regulator to the desired pressure, hook it to your keg and place the keg in the refrigerator. Again, it is not a bad idea to check your lines and connectors for leaks if you have not used the system before. The keg will begin to carbonate in a day or two and reach full carbonation within a week.
Enjoy Kegged Homebrew
You are now ready to enjoy your kegged homebrew! Always pour your beer down the side of the glass and open the tap fully. If you find that the carbonation level is too high, simply dial your CO2 pressure down a bit. If the beer is too flat, adjust the keg pressure up a bit. Invite some friends over and enjoy fresh homebrew from the tap!
It really is a effectively put together concept and shall be appreciated for that. Thank you for explaining what required to be said.
Pingback: Rapid All-Grain Beer Brewing Part 2 - Fermentation and Aging | Home Brewing Beer Blog by BeerSmith
Given this page and the one on Line Balancing, it seems to me there is a gap. I imagine that I need to balance my lines for some nominal CO2 volume and that is well covered. Next, I will vary my style from my usual and need a new volume CO2. I will take that new volume CO2 and a given line length and I will need to calculate a new keg pressure. Is this covered and I missed it? I also only see the pressure versus volume calculations in BeerSmith and not the balancing. If I haven’t simply missed that too, maybe it is something that can be added to a future release. Thanks, Brad and all the other contributors here!
Only use nitrogen if you are dispensing stouts or heavy wheat beers. Other than that , only use nitrogen to dispense if your line run is more than 20 feet and a higher pressure than 15lbs. Is needed. If a keg sits under pressure at more than 15lbs. Of straight co2 it will cause over carbonation and cause the beer to go flat 🙁
For most kegerator setups , 5ft of 3/16 Id. Beer tubing and set co2 pressure to 10lbs. And maintain temperature 35-38 degrees. Foaming is 99% either temp. Or pressure irregularities
My only issue is that here in Canada, particularly in my home province of Newfoundland Labrador, a keg system is $350 for a starter kit. So that it’s some thing that I can’t even consider.
Used systems are unavailable here. Most people here if they are into craft or home brewing are only doing it for themselves and don’t sell the equipment. As far as the public is concerned, home brew is yeasty crap that will give you a bad stomach.
They also don’t like not being able to drink from the bottle without having to deal with sediment.
We are the professional beer keg manufacturer in Guangzhou Chin.
Guangzhou Jingye Machinery Co., Ltd.
Expert in the US barrel, US stackable and the Euro standard keg, DIN standard keg with all the size.
High quality and competitive price.
Ken
[email protected]
After filling and displacing the air, should I let the beer age pressurized or un-pressurized before placing it in the kegerator to chill and serve?
Hi Brad,
I´m a long time fan of you, and a happy home brewer using your software. About tapping to keg I have one question. As I understand it is important to not subject the beer to air, bacauce oxidation? What I do before transferring the beer from my brewing system to the keg is to fill the keg with Co2. Due to that Co2 is heavier than oxygen it will keep a lid over the beer and shield if from the air, when filling up the keg. My question is if this procedure is “overkill” and if your recommendation of just “pushing” the air out after putting the lid on is sufficient? Maybe the question is a bit trivial, but looking forward to hear from an expert in the field:)
What I have found is that most gas supply places do not refill your CO2 bottle but swap out yours for one of theirs. Its disappointing when you show up with a nice new 5 pound bottle and they give you one that’s been around the world a couple times and you never see your bottle again. My recommendation buy a used bottle from someone and swap it out just like you would with propane bottles.
Cheers
Unfortunately true – a long time ago many would refill, but now most of the refilling is done in central locations and the gas suppliers simply stock bottles.