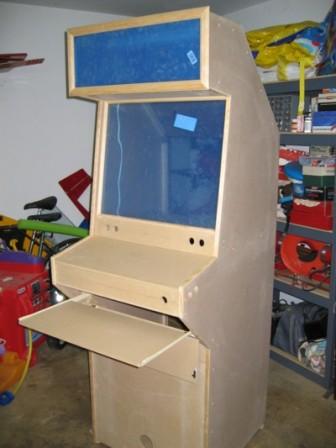
Building the cabinet was a bit of an impulse. I had known about MAME for some time, but never considered actually building one. While browsing the web one day, I found some examples. The construction pictures made everything look straightforward and easy. A few days later I was on my way to Home Depot to buy some sheets of MDF. It only took a little over two weeks to finish the original cabinet. The cabinet was ripped apart to create the modular panel about a month later (that took about a week after a few weeks of planning and ordering parts).
I wanted something with a classic arcade look that would not take a lot of room but would still support a two player panel. Though it probably would have been cheaper to convert an old scrap cabinet, the custom built cabinet provided more control over size and features like the keyboard tray.
I am no carpenter, but everything turned out OK. My only experience with a saw before this was cutting 2x4's to repair a wood fence. The cabinet was completed in the garage using only a circular saw, a $15 jigsaw from KMart, a $15 hand sander and a drill. A small hand miter saw was needed to do the molding. Needless to say I'm pretty happy with the way it turned out.
I decided on a 25-1/2" width based loosely on the measurements from Build a MAME cabinet in 24 hours. The actual control panel is 24" wide.
I added the following modifications:
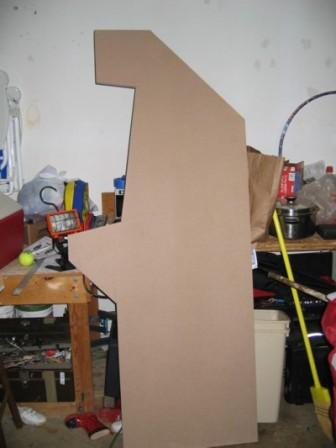 | The sides define the shape of the cabinet. I cut both sides from 3/4" MDF using a jigsaw. After cutting the first side I simply laid the first over the second so I could create a matching pair. I also clamped the sides together and sanded the edges so both sides matched. |
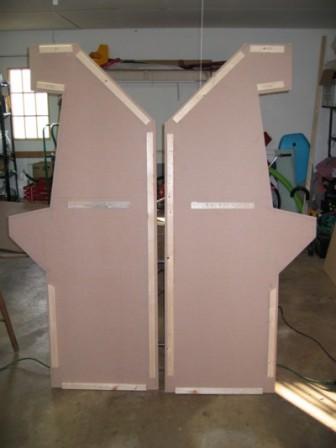
| I used 2x4 scrap wood as corner pieces and held it in place with 1-1/4" screws which are counter-sunk in the wood from the outside so the holes can be filled in later. All joints are both glued and fixed with screws - this made for a strong cabinet - there is no wiggle while playing games. I used 1/2" MDF sheet for the front, bottom and top panels, so all of the battens are set 1/2" from the edges. I was able to purchase the 1/2" wood pre-cut in 24" width which reduced the cutting needed since I'm horrible with the saw. The battens in the middle support the 3/4" MDF monitor shelf. Be sure you measure your monitor before placing the shelf. Ideally you want the monitor in the center of the glass once you are finished.
|  |

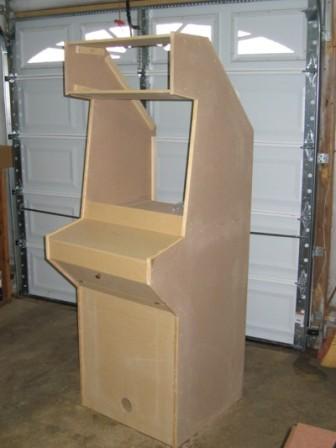
| This is actually one of the easier steps, and also a bit of fun since you can actually stand the cabinet up. All of the panels except the monitor shelf were cut from 1/2" MDF and then screwed into the battens I attached ealier to the sides. Again, all holes were counter-sunk so they could later be filled in. The large hole visible at the bottom of the front panel is for a woofer speaker. The hole will later be covered by the screen removed from the speaker box. I picked up a 3 speaker system cheap from CompUSA that had a wired remote. I mounted the remote on the keyboard tray for easy access later. |
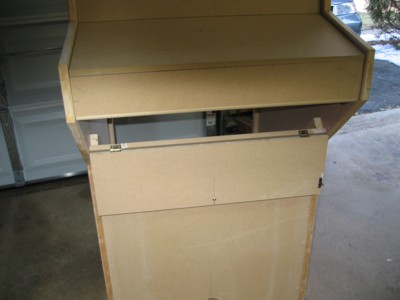
| A picture with the "speaker" panel added where two speakers are mounted (actually at the bottom of the marquee area) as well as the bottom bezel, control panel and a door in front. The door in front is held with cabinet clasps, but swings down to reveal a slide out keyboard tray. The entire front of the cabinet is edged in 3/4" half-rounded molding. This covers up minor imperfections from cutting the sides and provides a very clean finished look. It took some time to finish the molding as each piece must be precisely cut and fitted to give a clean finish. Minor gaps can be filled later when the screw holes are filled in.
|  |
| Here's a blowup of the drop down door. If I had to do it again I would probably use a larger piano hinge or a few more hinges as the small ones shown could eventually pull out under heavy use. The actual keyboard tray is just a piece of wood mounted on cabinet sliders from Home Depot. |
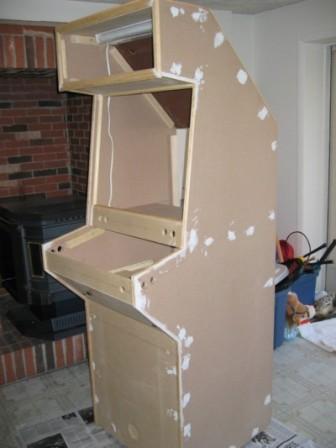
| Several small finishing steps shown here. A slot was cut in the top of the marquee area before the final molding was attached to the marquee. This allows the marquee to slide in and out from the top. The marquee is two layers of Plexiglas sandwiched together. Molding was attached all around the monitor Plexiglas again for a finished look. The keyboard tray was added. Holes were drilled for control buttons and pinball. The side buttons (two per side) are for pinball flippers and tilt. The forward-most button is for the pinball plunger and the buttons below the monitor bezel are for player 1, 2 controls.
|  |
| All of the screw holes were filled using wood filler and then sanded over. They are actually invisible on the final product. The entire cabinet was painted with two coats of heavy primer followed by two coats of Satin black acrylic. So far the finish has held up well to heavy use and abuse. You can also see the florescent marquee light in this picture. I picked it up at Walmart for $3.99.
|
|
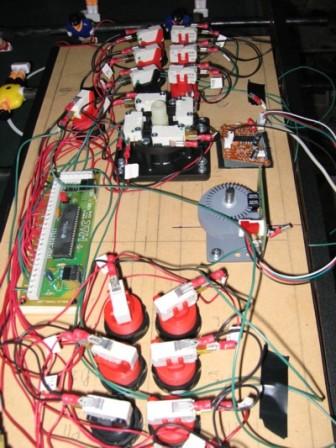
This is a picture of my first control panel just before I wired it. I eventually replaced it with the modular panel shown on the main page. The layout was 7 buttons per player, two joysticks and an oscar spinner. The panel was covered with Formica laminate which is very durable, but hard to drill through.
| 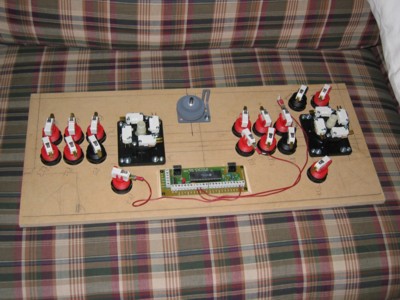 |
| A shot of my "old" control panel fully wired up. The wiring on the original panel was not too neat. Speed of wiring was favored over looks. Wires ran directly from this panel to the control and pinball buttons on the cabinet.
|
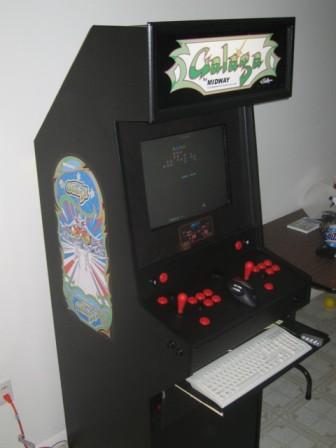
It was difficult to choose an artwork theme for the cabinet. The cabinet was finished well before I had a real "art concept." The original concept was just to use a "MAME" marquee copied off the internet. I printed a temporary marquee with MAME on it. After a few friends came over to try the cabinet out, it quickly became apparent that the average person has no idea what MAME is. At that point I moved on to looking at options involving classic video games.
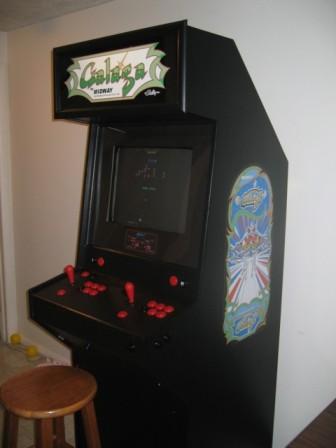
Galaga was one of my favorites video games of all time, and after some searching I eventually found a vectorized version of the artwork at Arcade Art Library. It also helps that the original Galaga cabinet was black - which happens to also be the color I painted this cabinet. I customized it slightly and had the the artwork printed at mamemarquees.com They do a VERY professional job. The marquee is printed on high gloss photo paper and is perfectly lighted when backlit by a small florescent bulb. The side art is printed on sticky vinyl plastic and then laminated to protect it. You just peel the backing off and apply it directly to the cabinet. They also helped me size the art appropriately, and the finished result is very professional looking. The pictures below really don't do justice to it - but the lighting in the basement is very poor.
The bezel in the current cabinet is nothing more than black posterboard with a small instruction card on it. I want to eventually replace it with a real "Galaga" bezel, but I'm still waiting for someone to complete a vectorized version suitable for resizing and reprinting. I've also toyed with printing a kick-panel at some point in the future, as the vector version is available.