• Welcome to the new forum! We upgraded our forum software with a host of new boards, capabilities and features. It is also more secure.
    Jump in and join the conversation! You can learn more about the upgrade and new features here.

Homemade mash tun

  • Thread starter BeerBatteredRob
  • Start date
B

BeerBatteredRob

Thinking of getting into all grain brewing fairly soon and am planning on converting one of those 10 gal. round Gott coolers for my mash tun. 
For anyone out there who has done this, about how much time and money would you estimate that i need to set aside to purchase parts and assemble it?

Thanks
 
Rob,

there are several ways of doing this.  I don't have a round Gott cooler I have a rectangular one but I followed the fairly popular "cheap and easy" mash tun way of doing things.  All in all the parts costs around 20 bucks. 

I'm not sure if this will work with a round cooler (though I don't know why not) or if you need to be a batch sparger like I am to use this method.  If you're planning on being a fly sparger and using the false bottom than this might not work

http://www.donosborn.com/homebrew/mashtun.htm

good luck!
 
thanks, do find any advantage in braided tubing over a copper piping manifold (other than price)? if it works as good/better i will go with that method to cut some costs.  here is the site that i was going to use to build mine:


http://beachbrewery.com/?page_id=99
 
Rob,

I went the cheap and easy route because, to be honest, I'm mechanically stupid.  It doesn't take long to lose me so the idea of doing anything complicated (very loosely defined) turns me off pretty quick. 

Having said that, I've managed to get efficiency up into the 80's pretty regularly with my system with very little dead space so I think the steal braid is just as good (plus the ease factor) as any other system out there.

$.02
 
I use a rectangular cooler with a large loop (slightly smaller than the cooler floor) of SS braid.
I do a continuous sparge method referred to as a super fly sparge. My efficiency usually runs between 80 and 90% and sparge time for 8.5 gallons in the kettle is usually under 25 minutes.

As far as cost goes, stainless braid supply line is about $5 for a 20 inch length. A "T" or straight length of tubing, a couple of stainless hose clamps, and some clear siphon tubing..<$15. If you add a faucet or ball valve..<$20 or 25.
I think whatever you decide to do will work for you.

Brew on, :)
jeff
 
http://hbd.org/cascade/dennybrew/

Denny Conn posts on tastybrew and brewboard.  He's sort of the godfather of teaching batch sparge and a really helpful dude.

I did mine this way with a minikeg bung.  That valve on northern brewer is cheaper and simpler than mine.  I wound up with 3 pieces: 2 Nylon Barbs and the PVC valve. 

The stainless braid is just a reliable way to allow for plenty of surface area. 

I had some extra 3/8 ID tube left over from my Immersion Chiller to use.

2 more things:
1.You can just crimp the braid shut
2.READ the label on the braid.  95% of the short lenght ones at Home Depot are Nylon or "Engineered polymer" something or other.  Just be sure you have stainless when you are shopping.

Jeff- Do you have a separate manifold for that superfly technique?  Or do you just get your runnings slowly while stiring in more water? 

Everyone says regular fly is slower but slightly more efficient.  Just Curious.
 
I do fly sparge (because I bought my 10G from someone who had already put a whirlygig in the top) and I have a SS false bottom (Phil's, I think).

I got only 65% efficiency with a 90 minute sparge yesterday, and that included stirring twice.

I'll probably get my own mill and make my grain finer eventually...
 
I just use Papazian's zapzap with my old bottling bucket in the bottom a regular bucket drilled with holes inside and spinning sparge arm above, my brewpot on the bottom, another bucket of hot water with gravity doing the rest.  Takes 45 minutes or so for a five gallon batch, I don't rush.
For mashing I placed a trash bag wrapped bucket in a cardboard box, filled the box with scrap styrofoam and 'Great Stuff' foaming insulation, and got an insulated place for my mash bucket.
I average 90% efficiency off ten pounds of grain mashed at 150 for 1.5hrs and a starting boil volume of 7-8 gallons.
 
Nice Maine!

I love hearing different techniques.  I eyeballed the zapzap but then got onto the cooler idea because a couple other guys I learn from do it.

I like making stuff to use.  I'm slightly idle now, but sometime in the next couple months I want to get some sanke HLT and Boil pot conversions made.

Of course I Ogle the cool brew trees and carts I see.  I doubt I'll get into pumps, I want to try to use gravity and siphon to do my work. 
 
i found this site today while browsing at work....shh!

for a very basic (dont really have the funds or know-how to go all out just yet) all grain set up, what do you guys think about this one:

http://cruisenews.net/brewing/infusion/page1.php

browse through if you like, he goes from the setup of the mash tun, through the brewing process for a batch.

not so sure i like the stopper idea, might go with one of the others i have seen for that part, and i definitely want a valve on it.

going to the hardware store on friday and gonna get started on putting it together, getting excited
 
BBR, It looks good.  I think all 3 guys have about the same idea.  My only worry with a 10 gallon is the future plan?  Will you aim to go to 10 gallon batches?  You might want to research how much mash space you need to accommodate big grain bills. 

It is probably just me.  I have always been an "overbuyer."  Sometimes its good, for HB, I can reuse most of my gear forever.  The bigger snowblower has been handy this year.  But I have lots of $50/gallon interior latex paint if funky-a$$ colors that is non-returnable because I went too big.

Otherwise have fun.

The good news is that everything I read says the coolers are just about ideal for mashing.

I need to make some photos of my efforts.  Let's make sure they are noteworthy :p 

I'll definately read his instruction section in addition to Dennybrew and my friends again before I make my AG brewday proceedure list.  I think we are aiming for 2/7.  An AG APA that I made as a partial before.  I'm jonesing to brew!  ;D

Thanks for sharing!
 
I saw his site too when I was just starting.

I think it's a pretty fantastic site for a beginner.  His is one of the only sites that shows pictures and takes you through the entire brew day.  That being said, there are a few caveats.

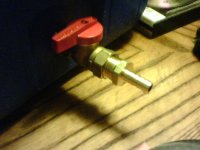
You're right about having a valve.  And why does he have like 8ft of tubing coming out of it?  He'd only need 6" of tubing if he had a valve...   The Stopper is brilliant if he never has a problem with it.

His aeration with the ladle is a bit questionable, but whatever.  I wear gloves that go nearly to my elbow and I make sure I stick them into my bucket of StarSan before I handle cool wort or stoppers or whatever is going to likely touch the wort.  Heck, with the thick gloves I can stir boiling wort without worrying about steam burns.

Why doesn't he USE the valve on it to dump the wort into his carboy?  He looks like he's about to have a hernia holding and dumping the wort.  You do NOT want to be trying to pour 50 pounds of wort as slowly as necessary.

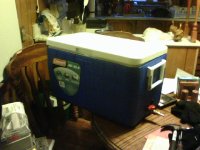
He also says he adds cold tap water to top it off when needed.  I don't think many people would agree.  Your water level shouldn't be a surprise to you--you'll know how much you have as you're boiling.  Add to the boil if you have to.  Before your first brew with your pot make an indicator stick (I used a plastic stirring paddle) showing the height of gallons in your pot.  I leave my chilling coil in for the entire brew day, so I made my indicator heights with the coil in.  I just used a sharpie to mark gallon increments, so I always know how much wort is in there.

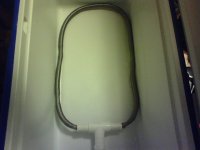
Obviously, this process is working for him.  It's a bit puzzling that he does some rather advanced stuff like saving yeast and using cornies yet he has no mashtun valve and has a distinctively McGyvered chilling coil.

If you already have cornies and CO2, I'd suggest fermenting in them and getting rid of carboys.  I used my carboy only 3 or 4 times and absolutely hated it.
 
The Dennybrew way (using the minikeg bung) makes for a good fit without that little piece of copper.  It's like Igloo's hole was drilled to except it.  Not sure on the big Gotts.  I got mine from the LHBS.  99cent

The build look me about 5 minutes. 

Tin snips for the braid and a screwdriver for the clamps.

Depending on where you get your stuff, let me beat a dead horse-beware of the "nylon" braids. 
 
I can see a couple pros to no valve-

He has little or no aeration because the end is in the pot.
It saves $2

But I wouldn't want a "dirty" hose in my pot even though there is going to be a boil.  I just try to keep stuff as clean as possible.

That "Bundle" IC is interesting.  I can only say I mimic'd the comercial ones.  I was supposed to make 2 and my buddy bagged out so Mine is 60' and ready to move to full boils.

Here it is in my lil 5 gallon pot.

I am in no way poking fun at this guys site.  He obviously has been at it longer than me.
 

Attachments

  • IC.jpg
    IC.jpg
    117.9 KB · Views: 1,386
A co-worker of mine was making extract brews until I turned him on to making all-grain.  His first batch was under my supervision (he can't learn if he doesn't do all the work now can he?) with my equipment.  Being that he's a senior system analyst, and I'm a lowly junior developer, he has the money to get parts for an igloo with a false bottom instead of recreating my homemade mess.
It works though, and required minimal purchasing since most of it is things I had anyway.
 
okay, here it is...time to get some ingredients and try out my hand at all grain brewing!
 

Attachments

  • 0117091658.jpg
    0117091658.jpg
    61.1 KB · Views: 731
  • 0117091700.jpg
    0117091700.jpg
    92.7 KB · Views: 674
  • 0117091659.jpg
    0117091659.jpg
    78.6 KB · Views: 646
Looks good BB Rob....What will you brew on its maiden voyage?
 
I'm no expert on stainless mesh tubes, but I thought I'd read somewhere to keep them away from the sides of the cooler.  Perhaps to limit channeling down the sides?  Anyone else?
 
MaltLicker said:
I'm no expert on stainless mesh tubes, but I thought I'd read somewhere to keep them away from the sides of the cooler.  Perhaps to limit channeling down the sides?  Anyone else?

hmm...i hadnt heard that, and i by no means am an expert on it either...if that is the case it should be a pretty easy fix
 
Found it........Palmer, "How to Brew"....plus some other drainage design tips:

..."In addition, it is very important to avoid channeling of the water down the sides from placing the manifold too close to the walls. The distance of the outer manifold tubes to the cooler wall should be half of the manifold tube spacing or slightly greater. This results in water along the wall not seeing a shorter path to the drain than wort that is dead center between the tubes."

http://www.howtobrew.com/appendices/appendixD-1.html
 
Back
Top